This is the last of three parts of the story about painting lady ‘Learjet’. Part two is here.
Let’s get back to work …
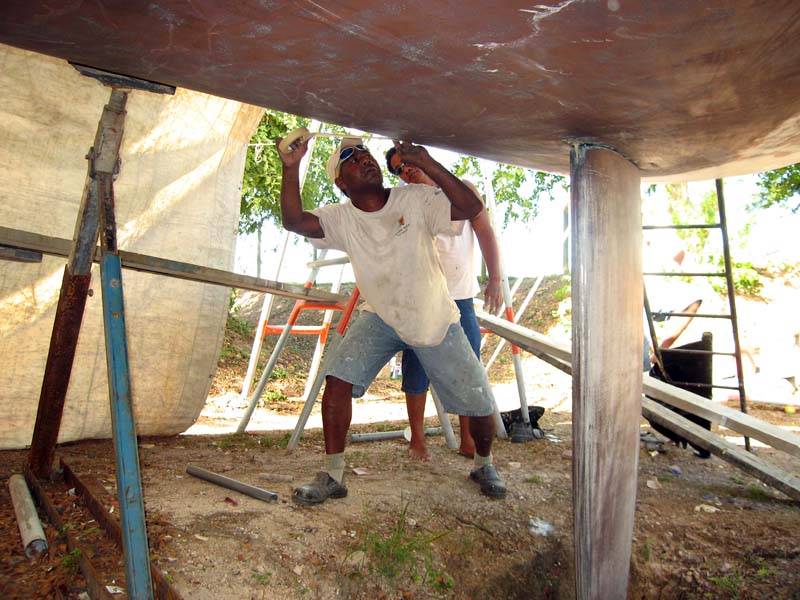
OK, remember all that hard work on the topsides of the boat? Well, we have to do mostly the same thing on the deck as well. There is less surface area. But there are tons of obstructions – hatches, blocks, you name it. In a perfect world, one would spend a few months removing every bit of deck hardware to do this, and putting it all back on again after the paint job is finished. But in a perfect world, I’d have more time, and money! All the funny surface angles and shapes and all those obstructions make for lots of taping and sanding in difficult places. I also had to take about half the surface down to fiberglass, re-bog and fair, just like on the topsides. So this is almost as hard as the topsides. The only saving grace is that most of the deck is covered in non-skid (paint with embedded particles so you don’t slip and fall on your arse). Because that results in a coarse surface, the fairing does not have to be as perfect as for the topsides. Phew, we’ll just pass on this “minor bit”, and get on with the painting….
Here we have a photo of our famous master painter:

Willie is doing some a bit of touch up sanding before spraying the first coat of Interprotect.
Willie has been painting for a couple decades now. He spent a number of years painting in New Zealand and ultimately being trained by the country’s best painter. Willie brought those top skills back to Fiji, where he joined up with Brian who provided financing and business acumen to start Baobob Industries, which offers an amazing range of services to cruising yachts.
One of the other great things about Willie is that smile!
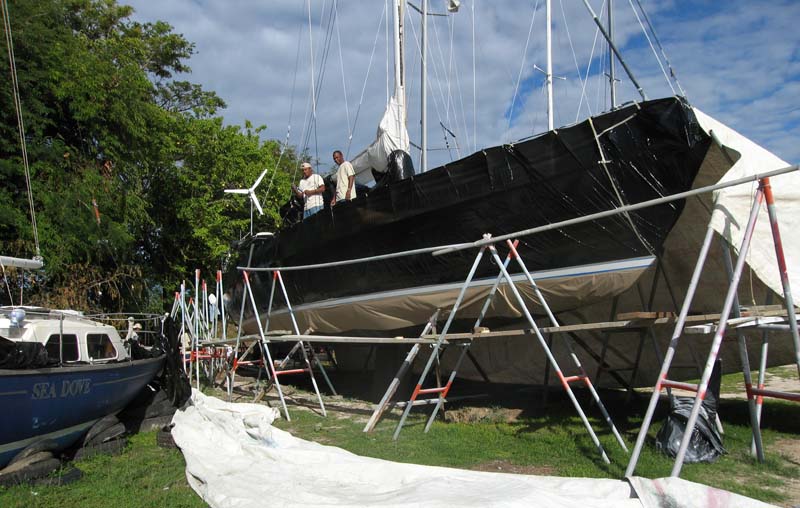
Here is a view inside “the tent” that covers ‘Learjet’ while she is being painted.

Learjet is far enough off the ground that Willie has to run around on that scaffolding in order to spray paint the sides. You can see it in the photo, but “the tent” is held together with a bunch of twine using the scaffold and Learjet’s stanchions for support. We’ll come back to some scary moments later.
Here we start taping the waterline. The whole bottom of the boat has to be covered in plastic, in order to prevent a coating of Interprotect all over the bottom of the boat.
And here is a view of ‘Learjet’ under her tent before the painting begins.

Remember that tree because we’ll come back to it later.
Oh, and don’t forget the air compressor for the paint gun:

Notice how we mix the paint in the cleanroom?

And yes, mixing paint is a 4 person job. 🙂
OK, so here we go. Finally, at long last, the first coat of International Interprotect on the deck:

Just like in an operating room, we keep the doctors sleeves rolled up with a bit of masking tape:

Ah, paint at last. You have no idea of how many weeks of effort it has taken to get to this point!

And now cleaning a clog out of the gun … If it takes slightly too long to get the next canister of paint attached and going, the paint can dry inside the gun. Or, it might be that cleanroom environment 🙂

Have you seen Glenn’s world renown winch artwork? Willie on left, crew on right.

Don’t forget the mascot

And his master, and the boss, Brian:

Back to painting … What a thrill to see Willie putting the first coat of Interprotect on the topsides:

This is an unbelievably hot and sweaty job inside that suit in the blazing topical heat and humidity. It takes skill, concentration, perseverance, and the eye and hand of a craftsman.
And don’t forget the encouragement of the crew:

There she is – deck with first coats and just one more side to go.

Ah … the topsides after many coats of Interprotect …

Don’t go worrying about that hole. That’s the drain hole for the compartment that holds the below-deck roller furler.
See that blue stuff? That’s called “glide coat”.

Believe it or not, we have more sanding to do. We use the blue paint as a guide to help fill and sand any spots that are not quite fair yet. The truly amazing bit is how Willie could look at that dull dark chocolate surface that was rough sanded and see with his eye whether it was fair or not. There is amazingly little sanding that is still necessary at this point.
A bit about this paint. It’s a very special epoxy primer, called a “barrier coat”. It’s water proof. It’s the only thing that keeps the sea water from getting into the fiberglass hull via osmosis. So from both functional and cosmetic perspectives, this layer of paint is critical! It’s also hellishly expensive. As I recall we burned up about $2500 worth of paint that day. A lot of it went up in paint smoke. And later, a lot of went up in paint dust as the hull was sanded to make her perfectly fair! Yep, that’s how it works. And after that sanding, we spent more money to spray on more barrier coat onto the now perfectly fair hull.
After lots more sanding and making everything perfect (many more days of work), the “top coat” is sprayed on. The barrier coat that we painted many days before dries quickly and you are going to sand it and fill it anyway, so minor imperfections don’t matter. But the topcoat is very very glossy, very sticky, much thicker, and takes a couple hours to become tack free. Furthermore, we have to put on several coats, without sanding in between. That requires putting on a coat, waiting the just perfect amount of time, putting on another coat, waiting again, etc. Wait too long, and the chemical bond between coats is not good enough and you might have a paint failure down stream. Wait not long enough, and you gets runs.
The topsides were sprayed with top coat first. It came out beautiful. Just gorgeous. But Murphy rules. We had been fighting the weather for weeks. The intense heat of the day would cause the mountain jungles to literally make their own thunder clouds. If the wind was not blowing right, they would blow off the mountains and paste us in the afternoon with a torrential downpour.
The day of putting topcoat on the topsides we had only 3 hours of cure time before the rain. It was not enough. The epoxy paint was hard enough that the rain did not “dent” the surface, but the remaining fine dust on deck was washed off and down the side and impregnated into the finish making “dirty” rivulets. Oh, and we had a squall at the same time that blew one of the scaffolds into the side of the boat, making a nice ding in the fresh paint job! So a day’s worth of work painting, more $1000s in paint went down the drain. Not to mention that now you have to let it dry for a day or two, and sand it, to get a mechanical bond for the next attempt at paint. Gads. The only good news is that the extra paint and sanding makes for a spectacular finish!
Painting the deck was even more of a nightmare. I won’t bore you with the details. But you have to paint it in panels. You have to fight the ever increasing frequency of days with rain. And you have to fight the debris from the bloody tree right next to the job.
After days and days of preparation and painting, the whole boat is covered with her beautiful new paint! The only painting that remains is putting on the blue bootstripe – that’s the blue line just above the waterline. To do that requires recovering virtually the entire boat, again! It takes two days of prep work to put on a strip of blue paint about 100mm tall!
We are going to paint that thin little strip between the black plastic and the brown paper!
Then there is the “graphics”. Replicating that was interesting. I spent about a week on that project. Before the painting started, I did a lot of measuring:

The original was hand painted. So I had to get some sort of sense for how it was laid out, and some base line measurement that I could use for double checking my work later. After all, the old graphics were sanded off many weeks before the new one went on.
And then there was 3 days of learning vector graphics in Photoshop in order to create the digital files necessary to cut new vinyl graphics. And then there was finding a vendor to make it and help me apply it. I thought close to $1500 was expensive, given that you can buy the vinyl material itself for less than $100. I shopped New Zealand, Australia and the USA. Sending the big graphics files from the unreliable and slow internet at Vuda Point was itself an interesting challenge. I ended up having to buy a fan to keep the local router cool – but that’s another story! Anyway, in the end it turned out that a local Fijian company, King’s Neon Signs, was able to offer me the best deal. And application was actually quite tricky. The graphics are huge – the lettering alone is 3 meters wide and 3/4 of a meter tall. The pin stripes add another 4 meters! After watching Willie’s man lay out the lines for the bootstripe, I was able to teach the graphics applicator how to do the same for the pin stripes (it took several attempts before he got the hang of it). And it came out beautiful.
The timing of everything was getting so critical. The graphics need to dry for at least 5-7 days before the boat can be lifted in order to ensure that the lifting straps do not move the vinyl around. With the rain delays and the extra little problems we had to tackle, I was faced with the very real possibility that the boat would not be ready before my crew arrived to help me sail Learjet back to New Zealand for the summer.
Almost done. Now we just have to put on new anti-fouling paint on the underwater surfaces (the old bottom paint had to be sanded off because it lost its killing power from being out of the water for so long).

And here she is, all shiny in her new coat of paint:


(photos courtesy Leah Pepe).
For those of you who are observant, Learjet has been undergoing a gradual color change over the years as various things have been renewed. The new graphics are now a lovely blue color, completely her transition from maroon and grey to blue and silver, inside and out.
The best graphics are on the transom.

I had Willie and his crew write their signatures. I combined that with a recreation of a bit of the Baobab logo (as seen on the back of their t-shirts) and created a graphic representing Willie signing his masterpiece – this was the first time Willie had ever signed one of his boats! It’s my pleasure and honor to own the first signed copy of Willie’s art!
Finally, at long last, after a long, hot, dirty and sometimes frightening, 10 weeks, Learjet is ready for the water again. Here she is in the travel lift on her way to the water.

She stops for an hour or so to get a few coats of anti-foul on the bottom of the keel.

Glenn with Willie and part of his crew.

Backing down the slip way:

Seconds before the splash:

(Launch photos courtesy Leah Pepe).
After rushing aboard to check for leaks, it is great to NOT hear the dreaded “glug glug glug”, especially after having replaced all the thruhulls!
I don’t have any great shots of ‘Learjet’ in the water, post paint job. Here is the best one so far, courtesy Dennis Gill. This is ‘Learjet’ lying in Gisborne, New Zealand, after the ocean passage from New Caledonia.

And here is Glenn, Antonin and Lori in New Caledonia just before bringing the flash new ‘Learjet’ to her new home in New Zealand. (Photo courtesy of Dennis Gill).

Would I do it again? Not on purpose. 🙂 This was not an easy project. It took 10 weeks instead of 2. A lot of unexpected obstacles had to be overcome. It was more expensive than I anticipated. And the unusual bad weather made a tough project even tougher. Like most boat projects, it was a very big learning experience. But lady Learjet is properly protected now. And she looks so beautiful in her glossy new digs. The fairing job on the topsides is so good that I suspect she looks better now than when she was new. Thanks to her advanced design when she was built, she could pass for a new boat now. Anyway, I think Willie and Brian at Baobab did an awesome job, and I’m glad I had Learjet painted by the famous Willie.
OK. Hopefully that’s the last major story about painting for a while!

Hi Glenn
She looks fantastic.
My 30year old GRP boat is in need of the same rejuvination and has never been painted, The sun has eaten some of the deck Gel coat and I need to at least paint the deck. But I know what will happen and that is I will end op doing the top sides as well.
Panache being 36ft may I ask what your final cost was, so I can get an idea.
Thanks
Happy 2010.
Dennis
By: Dennis Krawchuk on 1-January-2010
at 8:13 pm